
Hey in this post we will quickly create spring boot and angular 9 application and create rest endpoint to retrieve the list of records. We will also make HTTP GET requests from the angular application to the rest endpoint which is exposed by spring boot application. let’s begin…
Table of Contents
Create Spring Boot Application using Spring Initializer
There are many ways to create spring boot application, the quick and easy way to create a spring boot application is from Spring Initializr.  One thing about spring initializer is that it keeps updating, so when you navigate this website you may not see the screen which is showing the above. Make sure the enter the details correctly –
- Project – Maven
- Language – Java
- Spring boot version – 2.3.1 (this may varies time to time)
- Project metadata
- Group – in.bushansirgur
- Artifact – expensetracker
- Name – Expense Tracker
- Description – Full stack application with Angular and spring boot
- Package name – in.bushansirgur.expensetracker
- Packaging – jar
- Java – 8
- Dependencies
- Spring web
- Spring boot devtools
- Lombok
- Spring Data JPA
- Mysql driver
Create generate button, this will download the project in zip format, extract it, open it in any IDE eclipse/sts/IntelliJ
Spring Boot Project Structure
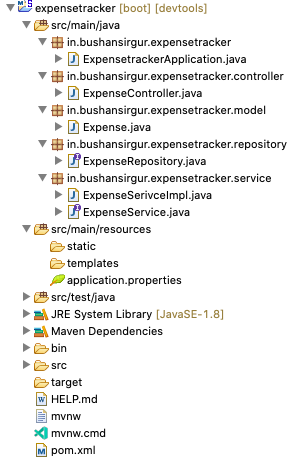
Let’s open the files one by one and add the following code…
pom.xml contains the following dependencies
<?xml version="1.0" encoding="UTF-8"?>
<project xmlns="http://maven.apache.org/POM/4.0.0" xmlns:xsi="http://www.w3.org/2001/XMLSchema-instance"
	xsi:schemaLocation="http://maven.apache.org/POM/4.0.0 https://maven.apache.org/xsd/maven-4.0.0.xsd">
	<modelVersion>4.0.0</modelVersion>
	<parent>
		<groupId>org.springframework.boot</groupId>
		<artifactId>spring-boot-starter-parent</artifactId>
		<version>2.3.1.RELEASE</version>
		<relativePath/> <!-- lookup parent from repository -->
	</parent>
	<groupId>in.bushansirgur</groupId>
	<artifactId>expensetracker</artifactId>
	<version>v1</version>
	<name>expensetracker</name>
	<description>Expense tracking application</description>

	<properties>
		<java.version>1.8</java.version>
		<maven-jar-plugin.version>2.6</maven-jar-plugin.version>
	</properties>

	<dependencies>
		<dependency>
			<groupId>org.springframework.boot</groupId>
			<artifactId>spring-boot-starter-data-jpa</artifactId>
		</dependency>
		<dependency>
			<groupId>org.springframework.boot</groupId>
			<artifactId>spring-boot-starter-web</artifactId>
		</dependency>

		<dependency>
			<groupId>org.springframework.boot</groupId>
			<artifactId>spring-boot-devtools</artifactId>
			<scope>runtime</scope>
			<optional>true</optional>
		</dependency>
		<dependency>
			<groupId>mysql</groupId>
			<artifactId>mysql-connector-java</artifactId>
			<scope>runtime</scope>
		</dependency>
		<dependency>
			<groupId>org.projectlombok</groupId>
			<artifactId>lombok</artifactId>
			<optional>true</optional>
		</dependency>
		<dependency>
			<groupId>org.springframework.boot</groupId>
			<artifactId>spring-boot-starter-test</artifactId>
			<scope>test</scope>
			<exclusions>
				<exclusion>
					<groupId>org.junit.vintage</groupId>
					<artifactId>junit-vintage-engine</artifactId>
				</exclusion>
			</exclusions>
		</dependency>
	</dependencies>

	<build>
		<plugins>
			<plugin>
				<groupId>org.springframework.boot</groupId>
				<artifactId>spring-boot-maven-plugin</artifactId>
			</plugin>
		</plugins>
	</build>

</project>
Configure the database
As we added the dependency MySQL driver, now let’s configure the database inside the application.properties file.
spring.datasource.url=jdbc:mysql://localhost:3306/expensetracker?useSSL=false
spring.datasource.username=expensetracker
spring.datasource.password=expensetracker

spring.jpa.generate-ddl=true
spring.jpa.generate-ddl=true this will help us to create tables inside the database when we run the application.
Make sure the that you already have database created with name expensetracker inside the mysql database
Create an entity class – Expense.java
if you remember, we have added the Lombok dependency while creating the spring boot application, its a java library, helps us to reduce all the boilerplate code, we don’t need to override the setters and getters inside the entity class instead we can use @Setter and @Getter annotation, Lombok behind the scenes creates setters and getters for us.
package in.bushansirgur.expensetracker.model;

import java.math.BigDecimal;

import javax.persistence.Entity;
import javax.persistence.GeneratedValue;
import javax.persistence.GenerationType;
import javax.persistence.Id;
import javax.persistence.Table;

import lombok.Getter;
import lombok.Setter;

@Entity
@Table(name="tbl_expenses")
@Setter
@Getter
public class Expense {

	@Id
	@GeneratedValue(strategy=GenerationType.IDENTITY)
	private Long id;

	private String expense;

	private String description;

	private BigDecimal amount;
}
Create a repository to perform database operations – ExpenseRepository.java
package in.bushansirgur.expensetracker.repository;

import org.springframework.data.jpa.repository.JpaRepository;
import org.springframework.stereotype.Repository;

import in.bushansirgur.expensetracker.model.Expense;

@Repository
public interface ExpenseRepository extends JpaRepository<Expense, Long> {

}
Create service and implementation class to communicate with the repository
ExpenseService.java
package in.bushansirgur.expensetracker.service;

import java.util.List;

import in.bushansirgur.expensetracker.model.Expense;

public interface ExpenseService {

	List<Expense> findAll();

}
ExpenseServiceImpl.java
package in.bushansirgur.expensetracker.service;

import java.util.List;

import org.springframework.beans.factory.annotation.Autowired;
import org.springframework.stereotype.Service;

import in.bushansirgur.expensetracker.model.Expense;
import in.bushansirgur.expensetracker.repository.ExpenseRepository;

@Service
public class ExpenseSerivceImpl implements ExpenseService {

	@Autowired
	ExpenseRepository expenseRepository;

	@Override
	public List<Expense> findAll() {
		return expenseRepository.findAll();
	}

}
Create a controller class to expose the rest endpoints – ExpenseController.java
package in.bushansirgur.expensetracker.controller;

import java.util.List;

import org.springframework.beans.factory.annotation.Autowired;
import org.springframework.http.HttpStatus;
import org.springframework.http.ResponseEntity;
import org.springframework.web.bind.annotation.CrossOrigin;
import org.springframework.web.bind.annotation.DeleteMapping;
import org.springframework.web.bind.annotation.GetMapping;
import org.springframework.web.bind.annotation.PathVariable;
import org.springframework.web.bind.annotation.PostMapping;
import org.springframework.web.bind.annotation.RequestBody;
import org.springframework.web.bind.annotation.RequestMapping;
import org.springframework.web.bind.annotation.RestController;

import in.bushansirgur.expensetracker.model.Expense;
import in.bushansirgur.expensetracker.service.ExpenseService;

@CrossOrigin("*")
@RestController
@RequestMapping("/api/v1")
public class ExpenseController {

	@Autowired
	ExpenseService expenseService;

	@GetMapping("/expenses")
	public ResponseEntity<List<Expense>> get() {
		List<Expense> expenses = expenseService.findAll();
		return new ResponseEntity<List<Expense>>(expenses, HttpStatus.OK);
	}

}
Now this will expose the rest endpoint, http://localhost:8080/expenses
Next, let’s create angular 9 application and make HTTP GET request to above rest endpoint to get the list of expenses
Create angular project
We will create an angular project using Angular CLI, let enter the following command inside your command prompt
You can read more about angular cli here
ng new expense-tracker-frontend
this will ask you a couple of questions, the first question is to adding support for routing, enter no, later we will add manually, next it will ask which stylesheet to use, make sure to select CSS, that’s it, with this it will create an angular project for us.
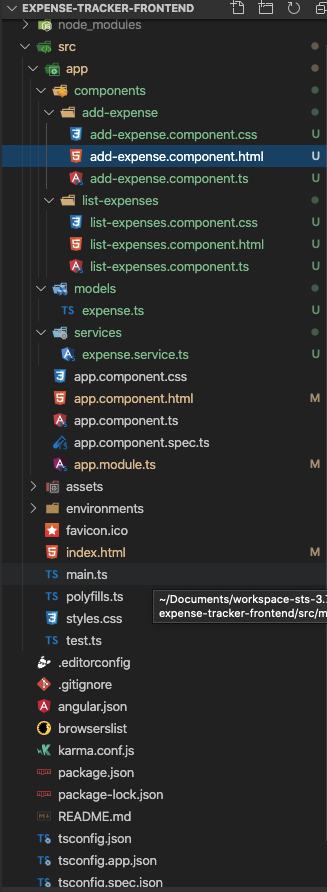
Angular project structure
following is the directory structure for angular 9 project –
Create a model, component, and service using Angular CLI
To create a model class
ng g class models/expense --skipTests
–skipTests will not create the spec files
To create component
ng g c components/listExpenses --skipTests
To create service
ng g s services/expense --skipTests
Here c – component, s – service and g – generate
Let’s open index.html and add the bootstrap4 library for styling –
<!doctype html>
<html lang="en">
<head>
  <meta charset="utf-8">
  <title>ExpenseTrackerFrontend</title>
  <base href="/">
  <meta name="viewport" content="width=device-width, initial-scale=1">
  <link rel="icon" type="image/x-icon" href="favicon.ico">
  <link rel="stylesheet"
        href="https://stackpath.bootstrapcdn.com/bootstrap/4.5.0/css/bootstrap.min.css"
        integrity="sha384-9aIt2nRpC12Uk9gS9baDl411NQApFmC26EwAOH8WgZl5MYYxFfc+NcPb1dKGj7Sk"
        crossorigin="anonymous" />
  <link rel="stylesheet"
        href="https://cdnjs.cloudflare.com/ajax/libs/font-awesome/5.14.0/css/all.min.css" />
</head>
<body>
  <app-root></app-root>
</body>
</html>
Next, open app.module.ts file and add the following code –
import { BrowserModule } from '@angular/platform-browser';
import { NgModule } from '@angular/core';
import { HttpClientModule } from "@angular/common/http";
import { RouterModule, Routes } from "@angular/router";
import { FormsModule } from "@angular/forms";

import { AppComponent } from './app.component';
import { ListExpensesComponent } from './components/list-expenses/list-expenses.component';
import { AddExpenseComponent } from './components/add-expense/add-expense.component';

const routers: Routes = [
  {path: 'expenses', component: ListExpensesComponent},
  {path: 'addexpense', component: AddExpenseComponent},
  {path: 'editexpense/:id', component: AddExpenseComponent},
  {path: '', redirectTo: '/expenses', pathMatch: 'full'}
];

@NgModule({
  declarations: [
    AppComponent,
    ListExpensesComponent,
    AddExpenseComponent
  ],
  imports: [
    BrowserModule,
    HttpClientModule,
    FormsModule,
    RouterModule.forRoot(routers)
  ],
  providers: [],
  bootstrap: [AppComponent]
})
export class AppModule { }
So I have created 4 routes,
expenses– for displaying the list of expensesaddexpense– adding/editing an expenseeditexpense/:id– getting a single expense''– this navigate to/expensesroute
Next, open app.component.html and add the router-outlet to display the view template –
<div class="container">
    <h1>Expense Tracker</h1><hr/>
    <router-outlet></router-outlet>
</div>
Next, open expense.ts file and add the following code –
export class Expense {
    id: number;
    expense: string;
    amount: number;
    description: string;
}
Next, open expense.service.ts file and add the following code –
import { Injectable } from '@angular/core';
import { HttpClient } from '@angular/common/http';
import { Observable } from 'rxjs';
import { map } from 'rxjs/operators';
import { Expense } from '../models/expense';

@Injectable({
  providedIn: 'root'
})
export class ExpenseService {

  private getUrl: string = "http://localhost:8080/api/v1/expenses";

  constructor(private _httpClient: HttpClient) { }

  getExpenses(): Observable<Expense[]> {
    return this._httpClient.get<Expense[]>(this.getUrl).pipe(
      map(response => response)
    )
  }
}
Next, open list-expenses.component.ts and add the following code –
import { Component, OnInit } from '@angular/core';
import { Expense } from 'src/app/models/expense';
import { ExpenseService } from 'src/app/services/expense.service';

@Component({
  selector: 'app-list-expenses',
  templateUrl: './list-expenses.component.html',
  styleUrls: ['./list-expenses.component.css']
})
export class ListExpensesComponent implements OnInit {

  expenses: Expense[] = [];

  constructor(private _expenseService: ExpenseService) { }

  ngOnInit(): void {
    this.listExpenses();
  }

  listExpenses() {
    this._expenseService.getExpenses().subscribe(
      data => this.expenses = data
    )
  }
}
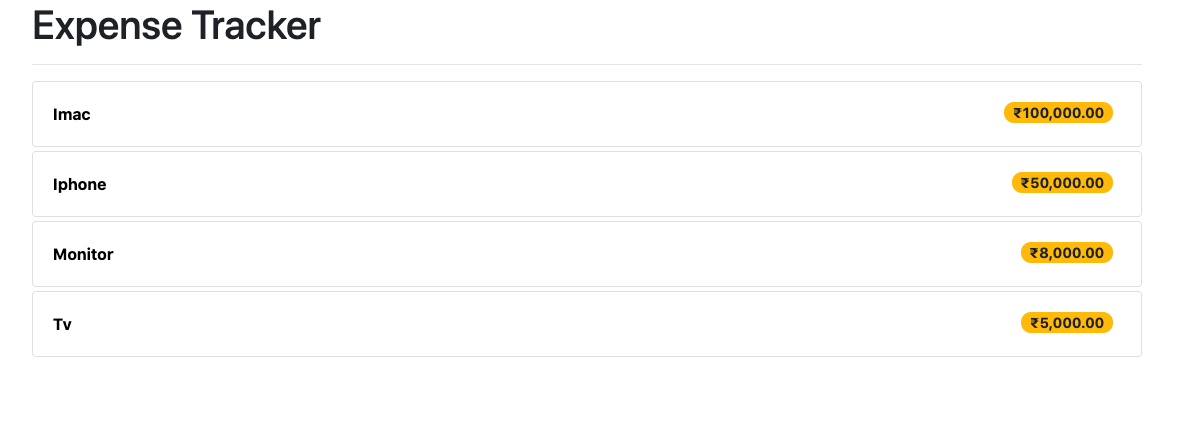
Now, open list-expenses.component.html and add the following code –
<div>
    <div class="card mt-1" *ngFor="let expense of expenses">
        <a href="#" class="card-body flex">
            <span class="text-capitalize font-weight-bold">{{expense.expense}}</span>
            <span class="float-right mr-2 badge badge-pill badge-warning font-weight-bold amount">{{expense.amount | currency: 'INR'}}</span>
        </a>
    </div>
</div>
With this in place, now if you run the application, you will see the following output –
You can find the Github repository here
You can find the step by step video series here