
Hey guys in this post, we will learn about creating REST API with Spring Boot, H2 Database, JPA, and Hibernate. We will also perform the basic CRUD (Create, Read, Update, Delete) operations.
Spring framework is one of the most popular frameworks in the entire java ecosystem. More than 90% of java enterprise applications using the Spring framework in their production.
Spring Boot is a tool to create Spring applications with zero configuration. Spring boot is getting popular day by day that is because you can create REST APIs and Microservices in no time.
JPA is a Java Persistence API, is the most popular data accessor API. It is also getting popular day by day. Almost all the spring boot applications using JPA to access the database data access layer. JPA is just a standard/specification and Hibernate is the implementation.
Table of Contents
Application features
So as part of this tutorial, we will be creating a Customer Relationship Management (CRM) API, it has the following features –
- Create customer
- Read single customer
- Read all customers
- Update customer
- Delete customer
Let’s see the rest endpoints for the above features –

Watch the video
Development steps
Following are the development steps to create the spring boot REST API.
Create spring boot application
There are different ways to create a spring boot application. You can pick any one of the following ways to create –
>> Create spring boot application using Spring initializer
>> Create spring boot application in Spring tool suite [STS]
>> Create spring boot application in IntelliJ IDEA
Update maven dependencies
Once the project is created open pom.xml and add the following maven dependencies
<?xml version="1.0" encoding="UTF-8"?>
<project xmlns="http://maven.apache.org/POM/4.0.0" xmlns:xsi="http://www.w3.org/2001/XMLSchema-instance"
	xsi:schemaLocation="http://maven.apache.org/POM/4.0.0 https://maven.apache.org/xsd/maven-4.0.0.xsd">
	<modelVersion>4.0.0</modelVersion>
	<parent>
		<groupId>org.springframework.boot</groupId>
		<artifactId>spring-boot-starter-parent</artifactId>
		<version>2.4.2</version>
		<relativePath/> <!-- lookup parent from repository -->
	</parent>
	<groupId>in.bushansirgur</groupId>
	<artifactId>springboot</artifactId>
	<version>v1</version>
	<name>springboot</name>
	<description>A spring boot jpa h2 demo</description>
	<properties>
		<java.version>1.8</java.version>
	</properties>
	<dependencies>
		<dependency>
			<groupId>org.springframework.boot</groupId>
			<artifactId>spring-boot-starter-data-jpa</artifactId>
		</dependency>
		<dependency>
			<groupId>org.springframework.boot</groupId>
			<artifactId>spring-boot-starter-web</artifactId>
		</dependency>

		<dependency>
			<groupId>org.springframework.boot</groupId>
			<artifactId>spring-boot-devtools</artifactId>
			<scope>runtime</scope>
			<optional>true</optional>
		</dependency>
		<dependency>
			<groupId>com.h2database</groupId>
			<artifactId>h2</artifactId>
			<scope>runtime</scope>
		</dependency>
		<dependency>
			<groupId>org.projectlombok</groupId>
			<artifactId>lombok</artifactId>
			<optional>true</optional>
		</dependency>
		<dependency>
			<groupId>org.springframework.boot</groupId>
			<artifactId>spring-boot-starter-test</artifactId>
			<scope>test</scope>
		</dependency>
	</dependencies>

	<build>
		<plugins>
			<plugin>
				<groupId>org.springframework.boot</groupId>
				<artifactId>spring-boot-maven-plugin</artifactId>
				<configuration>
					<excludes>
						<exclude>
							<groupId>org.projectlombok</groupId>
							<artifactId>lombok</artifactId>
						</exclude>
					</excludes>
				</configuration>
			</plugin>
		</plugins>
	</build>

</project>
Configure database
As we have added H2database dependency to the pom.xml, so let’s configure the database URL, username, and password. We will also configure hibernate properties for auto-creating the tables based on the entity. Open application.properties and add the following code –
spring.h2.console.enabled=true

spring.datasource.url=jdbc:h2:mem:crm
spring.datasource.driverClassName=org.h2.Driver
spring.datasource.username=sa
spring.datasource.password=

spring.jpa.show-sql=true
spring.jpa.properties.hibernate.dialect=org.hibernate.dialect.H2Dialect
spring.jpa.hibernate.ddl-auto=update
We have added spring.h2.console.enabled this tells spring to start H2 database administration inside browser, we can access by visiting this url http://localhost:8080/h2-console
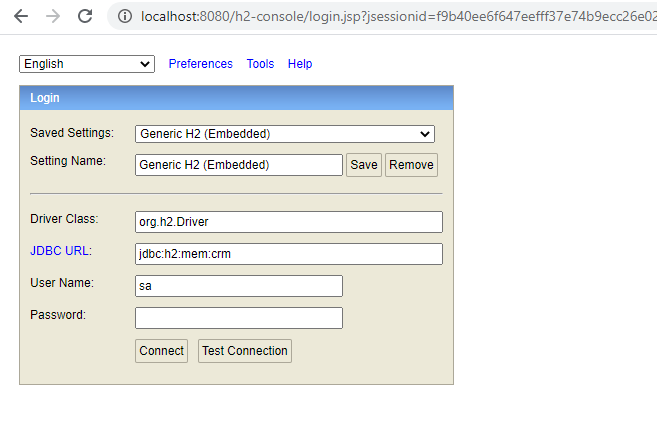 The default username for the h2 database is
 sa and there is no password for the database. Make sure to add the database name as crm
Note: We configure the H2 database with Spring boot to create and use an in-memory database in runtime, generally for unit testing or POC purposes. Remember an in-memory database is created/initialized when an application starts up; and destroyed when the application shuts down.
Create an entity
Create Customer.java class inside the in.bushansirgur.springboot.entity package and add the following fields
package in.bushansirgur.springboot.entity;

import java.util.Date;

import javax.persistence.Column;
import javax.persistence.Entity;
import javax.persistence.GeneratedValue;
import javax.persistence.GenerationType;
import javax.persistence.Id;
import javax.persistence.Table;

import org.hibernate.annotations.CreationTimestamp;
import org.hibernate.annotations.UpdateTimestamp;

import lombok.Getter;
import lombok.Setter;
import lombok.ToString;

@Entity
@Table(name="tbl_customer")
@Setter
@Getter
@ToString
public class Customer {

	@Id
	@GeneratedValue(strategy=GenerationType.IDENTITY)
	private Long id;

	private String name;

	private Long age;

	private String location;

	@CreationTimestamp
	@Column(name="created_at", nullable=false, updatable=false)
	private Date createdAt;

	@UpdateTimestamp
	@Column(name="updated_at")
	private Date updatedAt;

}
@Entity annotation must be added to the entity class, it tells that the entity class is mapped to the database table
@Table annotation is added to tell the name of the table to which the class is mapped to.
@Id annotation is added to make the field uniquely identified, its nothing but the primary key
@GeneratedValue annotation is added for auto-generating the primary key
@Column annotation is added to specify the column name. If you don’t provide @Column annotation then the field name will become the column name.
@CreationTimestamp annotation automatically adds the current date-time when a new object is created
@UpdateTimestamp annotation automatically adds the current date-time when an existing object is updated.
@Setter is a Lombok annotation, which will generate the setters. Similarly, @Getter will generate the getters and @ToString will override the toString()
Create JPA repository
Create ICustomerRepo.java interface inside the package in.bushansirgur.springboot.repository and add the following code
package in.bushansirgur.springboot.repository;

import org.springframework.data.jpa.repository.JpaRepository;
import org.springframework.stereotype.Repository;

import in.bushansirgur.springdatajpa.entity.Customer;

@Repository
public interface ICustomerRepo extends JpaRepository<Customer, Long> {

}
Spring Data JPA comes with several interfaces to access the database, one of the interfaces is JpaRepository, it provides some of the useful methods to perform the database operations such as Create, Read, Update and Delete
Create a controller to handle requests
Create CustomerController.java class inside in.bushansirgur.springboot.controller package and add the following code
package in.bushansirgur.springboot.controller;

import java.util.List;
import java.util.Optional;

import org.springframework.beans.factory.annotation.Autowired;
import org.springframework.http.HttpStatus;
import org.springframework.http.ResponseEntity;
import org.springframework.web.bind.annotation.DeleteMapping;
import org.springframework.web.bind.annotation.GetMapping;
import org.springframework.web.bind.annotation.PathVariable;
import org.springframework.web.bind.annotation.PostMapping;
import org.springframework.web.bind.annotation.PutMapping;
import org.springframework.web.bind.annotation.RequestBody;
import org.springframework.web.bind.annotation.RequestMapping;
import org.springframework.web.bind.annotation.RestController;

import in.bushansirgur.springboot.entity.Customer;
import in.bushansirgur.springboot.repository.ICustomerRepo;

@RestController
@RequestMapping("/api")
public class CustomerController {

	@Autowired
	ICustomerRepo customerRepo;

	@GetMapping("/customers")
	public ResponseEntity<List<Customer>> getAllCustomers() {
		try {
			List<Customer> list = customerRepo.findAll();

			if (list.isEmpty() || list.size() == 0) {
				return new ResponseEntity<>(HttpStatus.NO_CONTENT);
			}

			return new ResponseEntity<>(list, HttpStatus.OK);
		} catch (Exception e) {
			return new ResponseEntity<>(null, HttpStatus.INTERNAL_SERVER_ERROR);
		}
	}

	@GetMapping("/customers/{id}")
	public ResponseEntity<Customer> getCustomer(@PathVariable Long id) {
		Optional<Customer> customer = customerRepo.findById(id);

		if (customer.isPresent()) {
			return new ResponseEntity<>(customer.get(), HttpStatus.OK);
		}
		return new ResponseEntity<>(HttpStatus.NOT_FOUND);
	}

	@PostMapping("/customers")
	public ResponseEntity<Customer> saveCustomer(@RequestBody Customer customer) {
		try {
			return new ResponseEntity<>(customerRepo.save(customer), HttpStatus.CREATED);
		} catch (Exception e) {
			return new ResponseEntity<>(HttpStatus.INTERNAL_SERVER_ERROR);
		}
	}

	@PutMapping("/customers")
	public ResponseEntity<Customer> updateCustomer(@RequestBody Customer customer) {
		try {
			return new ResponseEntity<>(customerRepo.save(customer), HttpStatus.OK);
		} catch (Exception e) {
			return new ResponseEntity<>(HttpStatus.INTERNAL_SERVER_ERROR);
		}
	}

	@DeleteMapping("/customers/{id}")
	public ResponseEntity<HttpStatus> deleteCustomer(@PathVariable Long id) {
		try {
			Optional<Customer> customer = customerRepo.findById(id);
			if (customer.isPresent()) {
				customerRepo.delete(customer.get());
			}
			return new ResponseEntity<>(HttpStatus.NO_CONTENT);
		} catch (Exception e) {
			return new ResponseEntity<>(HttpStatus.INTERNAL_SERVER_ERROR);
		}
	}
}
Run the application
Now we have created the REST API for customer relationship management. It’s time to run the application. There are two ways to run the spring boot application
- By executing the maven command from the root of the application
$ mvn spring-boot:run
- By running the java class
Open SpringbootApplication.java class, it has a main() method. Run the file just like running any other java class.
In a few seconds, the application will start running on port 8080 (localhost:8080)
Test the REST API
We cannot test all the rest endpoints inside the browser. Instead, we will use Postman to test all of the rest endpoints.
- POST
/api/customers 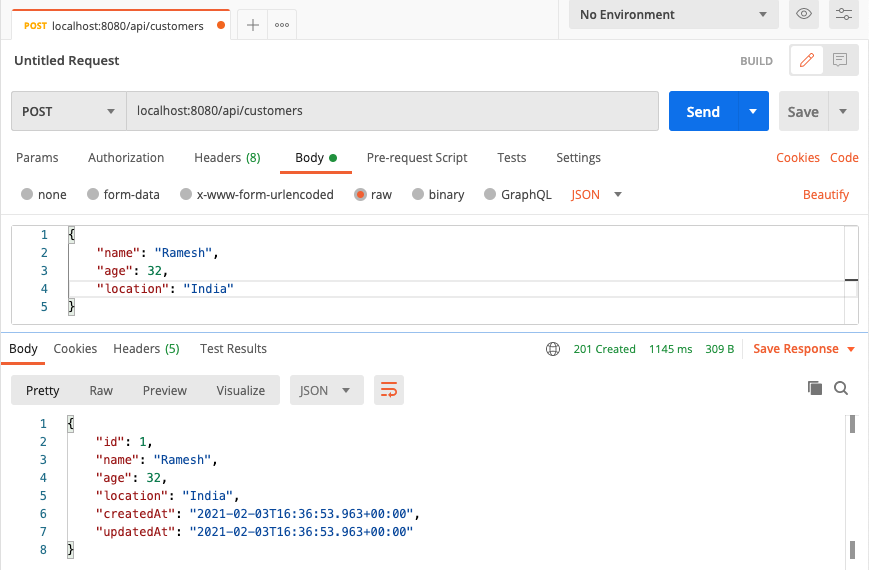 GET
GET /api/customers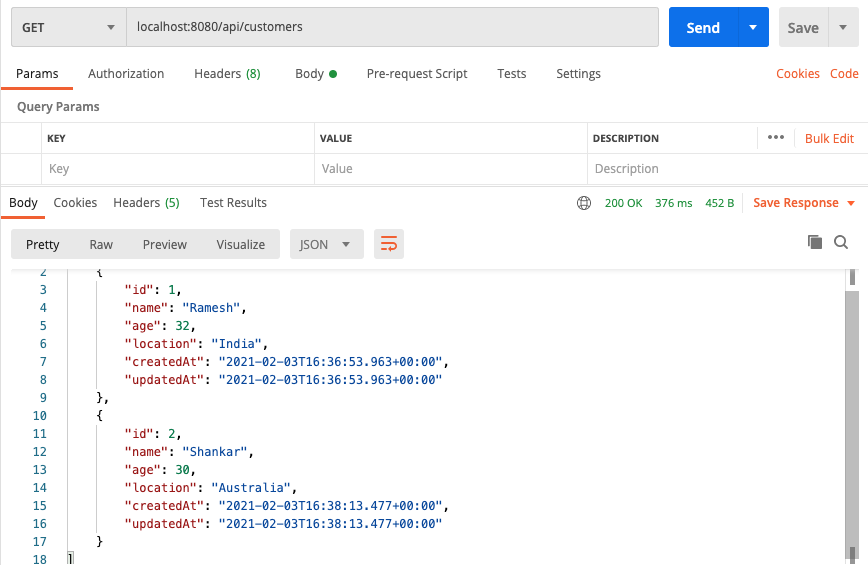 GET
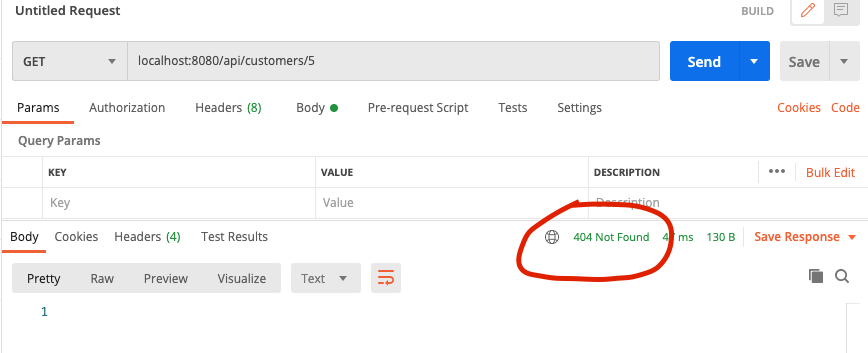
GET /api/customers/2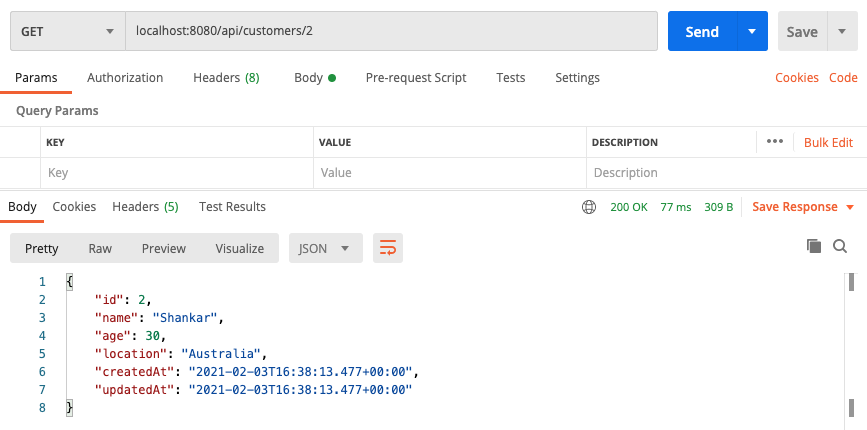 GET
GET /api/customers/5
 PUT
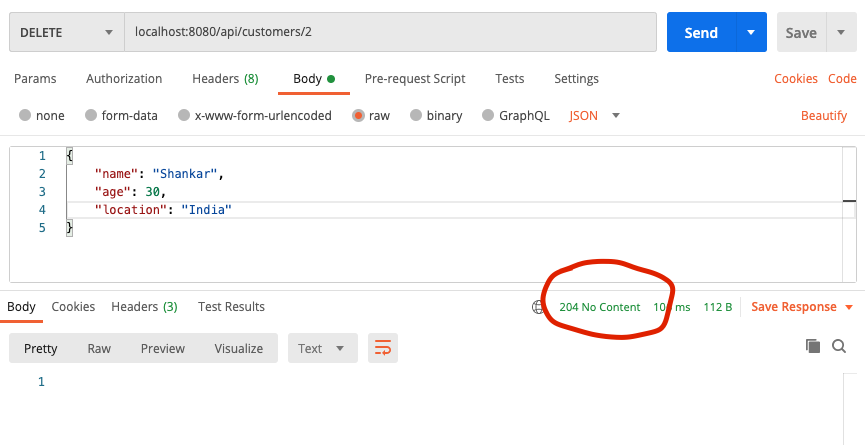
PUT /api/customers DELETE
 /api/customers/2
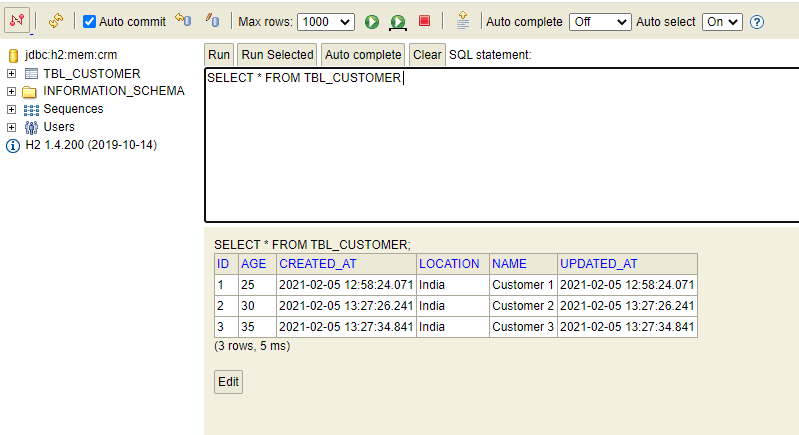
 Let’s verify once in the H2 Database:

Hi Bushan,
The following import is mentioned in ICustomerRepo.java
import in.bushansirgur.springdatajpa.entity.Customer;
But the above java class was not created in your tutorial.
I have managed to create the application and test it through postman. However, name,age,location fields are not inserted in tbl_customer when I POST request through postman. Other fields such as ID, CREATED_AT,UPDATED_AT are inserted in TBL_CUSTOMER.
My request in postman:
{
“name”:”test”,
“age”:32,
“location”:”India”
}
The response is showing as below in postman.
{}
Can you please clarify why name,age,location fields are not inserted in TBL_CUSTOMER and a valid JSON response body is not received in Postman?
Thanks
Hi Bushan,
Loved it, thank you a lot!!
First I would like to thank you for putting the time and effort into publishing your knowledge.
I have managed to run though this demo successfully, but i do have couple of questions if you can answer to me.
I have used eclipse 2023-06 with Java 17 to go through this demo.
in my IDE i has to generate setters and getters regardless to the lombok package. otherwise, the app would not pass the values from postman. can you explain this why?
Also in Repo class i get Unnecessary `@Repository` indication. the app is working but seams to me that since you worked in a different ENV i get this indication, why? and should i be worried?